
Monthly Archives: August 2014

The User Experience: Navigating Through the Clutter
A user-friendly experience on any website or blog begins with the functionality and coherence of the entire page. If you look at the page and everything just “makes sense” then you are probably going to have a great user experience. Essentially, the more simple yet creative a page, the better the experience. I mean, no one wants to enter a page, only to reason it will take 10 clicks to get to your target.
Take Zara’s page for instance, the entire site exudes a kind of stark simplicity. The title of the website is top center, the left side has all of the links and the middle of the page features a slideshow of the updated items on the site. If you click on one of the buttons, for instance “Woman,” you are greeted with several different options from there to pick. From “Coats” to “Accessories,” you have the option of clicking several categories for your shopping pleasure. If you click “Coats” you are immediately taken to the coats page where you can finally pick out and purchase that leopard fur coat you’ve had your eye on.
Zara focuses mainly on their products, so the user experience is a good one. You don’t have to sift through articles and blog posts about their newest products or see endless explanations about how something can be worn. Zara is essentially simple and to the point with no fuss on anything but its products. Furthermore, if you’ve ever been in a Zara store, you realize that the site is a reflection of the stark simplicity of the inside of its actual store. The parallel there is fantastic since it actually embodies the character of the brand.
If you take note from Zara, you will quickly realize the following:
- Design with your user in mind
- Keep it simple
- Make it so easy to navigate your dog can do it
- Keep it consistent
- Be a minimalist and lose the complexity
Let’s peel away the layers of the user experience using the 5 planes discussed by Jesses James Garrett in his book, The Elements of User Experience.
- The Surface Plane: Series of images that perform different tasks, visual and clickable.
- The Skeleton Plane: Placement of buttons, controls, photos and blocks of text.
- The Structure Plane: How users got to that page and where they could go when they were finished there.
- The Scope Plane: The way in which the various features and functions of the site fit together.
- The Strategy Plane: Incorporates not only what the people running the site want to get out of it but what the users want to get out of the site as well.
So let me break these terms down for you with the example of Zara. First, you get to the page and you see the simple layout with self-explanatory features. This is the surface plane made up of the different images featuring new fall fashions and items new to the sale category. The skeleton plane features things like “New Arrivals,” “Woman” and so on that allow you to click on these things to get to the “Coats” and “Tops” sections in order to shop. The structure is basically how you got from the home page all the way to buying your favorite leopard fur coat and then back to shopping. The scope is how all of the pictures of the coats and various other items like the jeans are incorporated so the page is clean and not jumbled. The strategy essentially is to ensure that the site is easy enough to navigate for people to shop and buy things while having a user-friendly experience where they come back for more.
Questions to ponder:
1. Is a page ever to over-simple making it seem boring?
2. What are the worst user experiences you’ve had and what did you learn not to do?
Source of image: http://www.zara.com/us/en/woman/coats-c269183.html

Do Not Reinvent the Wheel: The Dummies’ Guide to Website Literacy
When someone looks at your website you have a little less than a minute to capture the viewer’s attention. In that short time span you have to engage your viewer almost instantly and if your page isn’t up to snuff, goodbye viewer. So, what can you do to keep your viewer’s interest? Well, Krug outlines various ways starting with “don’t make your viewer think.” In fact, it is Krug’s First Law of Usability.
Your viewer should be able to “get it” – what it is and how to use it – without expending any energy, after all you have less than a minute to keep your viewer interested. For instance, icons on the front page should be labeled as “pictures”, “about me”, “contact me”, not “graphicland”, “moi”, “let’s chat”. The navigation through your site should be obvious enough that thinking is hardly required. Essentially, your main objective when creating a website should be eliminating your viewer’s question marks.
On the other hand, if you can’t make something self-evident at least make it self-explanatory (so it only requires a little mental effort). Make your page so easy to navigate it’ll make your user squeal with excitement (I don’t know if squealing will actually happen, but they’ll at least be a little pumped). The content is where you can put your originality and creativity to work, leaving your viewer wanting more. However, in the case of your page – give your viewer everything they could want and more.
So for simplicities’ sake, let me break it down for you:
- Intuitive: like Jimmy John’s, the site should be so navigable the viewer will freak
- Scannable: the content should be broken up so the viewer can scan the page and pick up the gist of what you are saying in a matter of seconds
- Use of conventions: essentially graphics that are universal and let your user click on the image without a sliver of a doubt (i.e. the shopping cart icon leads them to the check-out)
- Do not reinvent the wheel: use these conventions and use them well my friends, they’re universal for a reason
- Visual hierarchies: write like a journalist (i.e. inverted pyramid of most important info. first, least important last)
- Use headings: duh.
- No extra noise: let your content speak for itself
- Highlight: if something is important, show your reader (see what I did there?)
- Rule of Clicks: the user should only have to click to something in 3-4 clicks and it should be as painless as possible (i.e. Contact us > Advertising Department > Advertising Director > Bingo: Betty 555-5555)
- No nonsense: get your point across in as concise a way as possible and get rid of all that fluff
I’m a shopping addict, so the Piperlime site is as intuitive as anything I could ever want. Literally, you go to the page and immediately you are greeted with gorgeous pieces that you want in your wardrobe in a clickable scrolling headline. There is a tool bar across the top, the logo is in the left corner and daily deals are mentioned at the very top. Then you click on what you want.
Like I said I have an addiction so the “What’s New” tab is my go to – I literally already have the old pieces memorized and categorized, it’s sad. At this point you now have the option of clicking several different categories and shortcuts to get where you want to go, i.e. OP Picks (Olivia Palermo and her fashion fluency, of course). Or, I mean you could just look at the entire list of new goodies right then and there (where I then add 30 new items to my shopping basket – do they have a shopaholics anonymous?)
Questions to ponder:
1. How simple is too simple?
2. Is re-creating the wheel ever useful?
Source of Image: http://piperlime.gap.com/browse/home.do
A Very Graphic Resume

If you would like to get in touch, e-mail me at: abuchart93@hotmail.com.
So, just to be clear I spent a lot of time doing this Infographic Resume on Photoshop and I really loved the outcome. I picked a color scheme of pale yellow, turquoise, black and white (of course with a hint of purple for good ole FU).
I happened to already have the photo of myself (senior photo) and it fit perfectly with my color scheme. And to also give credit where credit is due, the Furman University graphic is from the source (http://www.bekahoconnor.com/138640/2726457/illustrations/furman-university-campus-map – very lovely by the way).
I only used two separate fonts: Candara and Zapfino. I wanted the script to be elegant, simple and clean – and I think the fonts accomplished just that.
Also, I used the Furman University graphic to base my timeline around because all of the activities I have listed took place in college.
I love the turn-out!

Editing: How Our TV Addiction Was Established
Have you ever thought producers of shows might edit the various shots to be more meaningful in order to capture your interest? If you have ever pondered this for a second, you are indeed correct. In the chapter entitled, “Aesthetics of Editing,” Osgood & Hinshaw discuss the different ways one may edit a video and the significance of editing.
So…what goes into editing? Well, let me outline it for you!
- The Order: the way shots are arranged develops a plot line
- The Relationship: establishing believability with patience and attention to detail
- Time: the editor must constantly consider the length of each shot, each scene and each program
- The Rhythm & the Pace: an image should be on screen long enough to transfer the information to the viewer
- The Continuity: maintaining story consistency from shot to shot and within scenes. Remember to:
- Maintain screen direction
- Matching eye lines (when two characters speak with each other)
- Use of vectors (i.e. character looks off-screen, then shot of what the character sees shortly follows)
- Establishing shot (establishes the location of the scene each time location changes)
- Montage: a grouping of unrelated images to produce a new meaning
- Sequencing: a series of shots that relate to the same activity
- Transitions: change from one shot to another
Before I go onto an example of all of these elements in action, let me rant about transitions and the importance of them. A series of shots should flow naturally together so the audience can follow the storyline without getting a headache from confusion. There are several different types of transitions like mixing, fading, dissolving and wiping. However, the most important transition to me is the fade from one scene to the next. I mean honestly, a video isn’t a slideshow of your favorite photos with nifty transitions. The transition should be seamless and smooth and occur so un-dramatically that the audience is simply aware of a continuing storyline. Simple is better, people!
Alright as promised let me provide you with a little example that incorporates all of these elements so you get the picture. I particularly like the show Gossip Girl, so I’ll focus on an example from that. First, the opening shot of each show pans over Manhattan in some dreamy way, slowly focusing in on Serena’s Penthouse all the while GG (Gossip Girl, duh) begins with her snarky dialogue about the debaucherous Upper-Eastsiders. The relationship is thus established between Manhattan, the Penthouse and then an image of Serena laying in her bed thinking about her lover-boy, Dan. The rhythm is slow with a consistent pace where each image stacks on the next to provide a clear storyline of where that particular episode is going. The sequencing of the images not only establishes the location, but the deeper meaning of the episode as well, naturally with the help of GG’s narrations. Also, each scene fades into the next to distract the audience as little as possible with the actual changing between scenes and have them focus more on the actual plot line.
Isn’t editing fun? I bet you never even knew how much thought and work went into each tiny scene shown in your favorite shows. Gives you a whole new appreciation for them, huh?
Questions to ponder:
- Who came up with this genius idea of editing images in movies and shows so we become even more addicted than we already are?
- Are there any new techniques to try?
- Where will the future of videography and editing go next? (I can only imagine!)
Source of Image: http://en.wikipedia.org/wiki/File:Gossip_girl.jpg
The Unedited Gems of “Conservative Chic”
This post is simply to show the transition the photos took before Photoshop editing took place.


Conservative Chic
The series of photos below tell a story about how buyers in the Greenville area bring high fashion to their boutiques and integrate Greenville’s conservative tastes.


Business Card
Shown above is the front of my business card which includes my name, subject of business, my school, and my contact information. If we’re being honest it took me a while trying to figure out all of the features on Photoshop because I hadn’t played with it for quite some time. However, once I got the hang of it I spent hours playing around with different images and features inside the application.
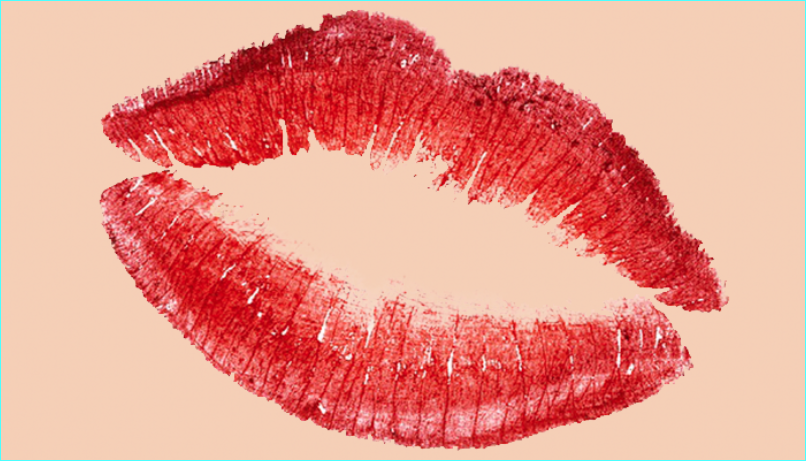
To start, I found two images on the internet that were copyright free and I played around with them a bit. I chose lipstick lips and a mascara wand with the black ink running because if I were to ever start my own business at this juncture I would have my own makeup company. Sadly, it is just a dream but I had a lot of fun playing around with a potential business card for my dream makeup company (makeup enthusiast).
Anyways, the break down of what I did is as follows:
First, I created a new layer above the background because I didn’t want to make any permanent changes on top of the background layer. Next, I chose a peach, flesh tone color that I thought was a pretty neutral for the pictures and text I would layer on top. Next, I inserted the picture of the mascara wand by dragging and dropping on an entirely new layer and selected “place” photo. I used the quick selection tool with the (+) to select all of the pieces of the background inside the mascara brush picture to get rid of the white background after clicking “add layer mask” at the bottom. There were still some background pieces within the black ink of the mascara so I used the magic wand tool to quickly select those and delete them. Whew! That took a while to figure out (probably the bulk of my brain power).
After that I wanted the mascara wand and its color to have a metallic sheen to it so I searched around in the effects and gave the image a gradient metallic-y gray and was really excited about what I saw. The image literally took on a silver sheen and I loved it!
Next, I wanted to add text, and there are only two different types that I used. For my name, I chose “Lucida Handwriting” in pt. 18 font. I wanted the color to match the lips picture I was going to put on the back of the card so I tried to eyeball it and match the color. I know there’s an actual tool I could have used for that but it was a little complicated for me to try to figure out at the time. Next I added the make-up enthusiast, Furman University, my e-mail and cell all in separate layers with the font “Orater Std” in font size 8. I loved the outcome so I was pretty excited about the overall look.
After, I went back and decided to add a shadow to my name in the same color red with the fx tool on the side by right clicking the layer and going from there.
Finally, I placed the picture of the lips and went through the same process that I did with the mascara wand. I removed the background with the quick selection tool and clicking add masking layer. Then, I removed the middle background color from the lips using the magic wand tool and using the delete button from there.
My final step was to link all of the layers together and use the Layer > Flatten Image option and flattened all of the images together. It came out to be two different tabs with the back of my business card and the front. I was really happy with the turn out!
